蘇州亞歐橋食品機械有限公司

Fun Chocolate Decor

> 消息 > 其他新聞  > Fun Chocolate Decor

證書展示

Certificate 8
Certificate 7
Certificate 6
Certificate 5
Certificate 4
Certificate 2
Certificate 3
Certificate 1

工程案例

巧克力塊生產線

巧克力塊生產線

2026-04-13 11:05:52

巧克力塊是最簡單、最受歡迎的巧克力之一。巧克力塊的生產需要巧克力原料加工設備和成型設備。先將融化罐中的固體脂肪融化,將砂糖倒入糖磨機中粉碎備用。然後用幫浦將液體脂肪轉移到攪拌機中,手動將可可粉移入攪拌機中攪拌。攪拌機中還需要巧克力的其他成分,如奶粉、乳清粉等。混合後的物料經由幫浦輸送到精磨機進行研磨。在精煉機中,巧克力漿料經過混合攪拌,達到均質、乳化、脫臭的效果。 10-12 小時後,巧克力被研磨至 25 微米以下。泵將磨碎的物質從精煉機轉移到儲罐中,以進行下一步的成型和生產。如果是真巧克力,就需要調溫機來調節溫度。巧克力漿透過泵浦從儲料槽輸送至調溫機,調溫後的巧克力漿經由壓力輸送至成型機進行成型。

夾心巧克力生產線

夾心巧克力生產線

2026-04-13 11:05:15

夾心巧克力是眾多巧克力類別之一。不同的三明治口味會帶給消費者不同的體驗。透過改變口味,可以增加巧克力的品種。先將融化罐中的固體脂肪融化,將砂糖倒入糖磨機中粉碎備用。然後用泵將液體黃油轉移到精煉機中。根據配方,將可可粉、糖粉、奶粉、乳清粉等依序加入精煉機中。一般來說,巧克力餡和巧克力有不同的配方,需要兩個單獨的精磨機來研磨。在精煉機中,巧克力漿料經過混合攪拌,達到均質、乳化、脫臭的效果。 10-12 小時後,巧克力被研磨至 25 微米以下。巧克力餡料和巧克力分別輸送到相應的保溫罐儲存,為下一步成型做準備。如果巧克力是真巧克力,就需要調溫機來調節溫度。巧克力漿透過泵浦從儲料槽輸送至調溫機,調溫後的巧克力漿經由壓力輸送至成型機進行成型。普通脫脂巧克力可以透過一條注射成型線生產。

巧克力塗層生產線

巧克力塗層生產線

2026-04-13 11:04:27

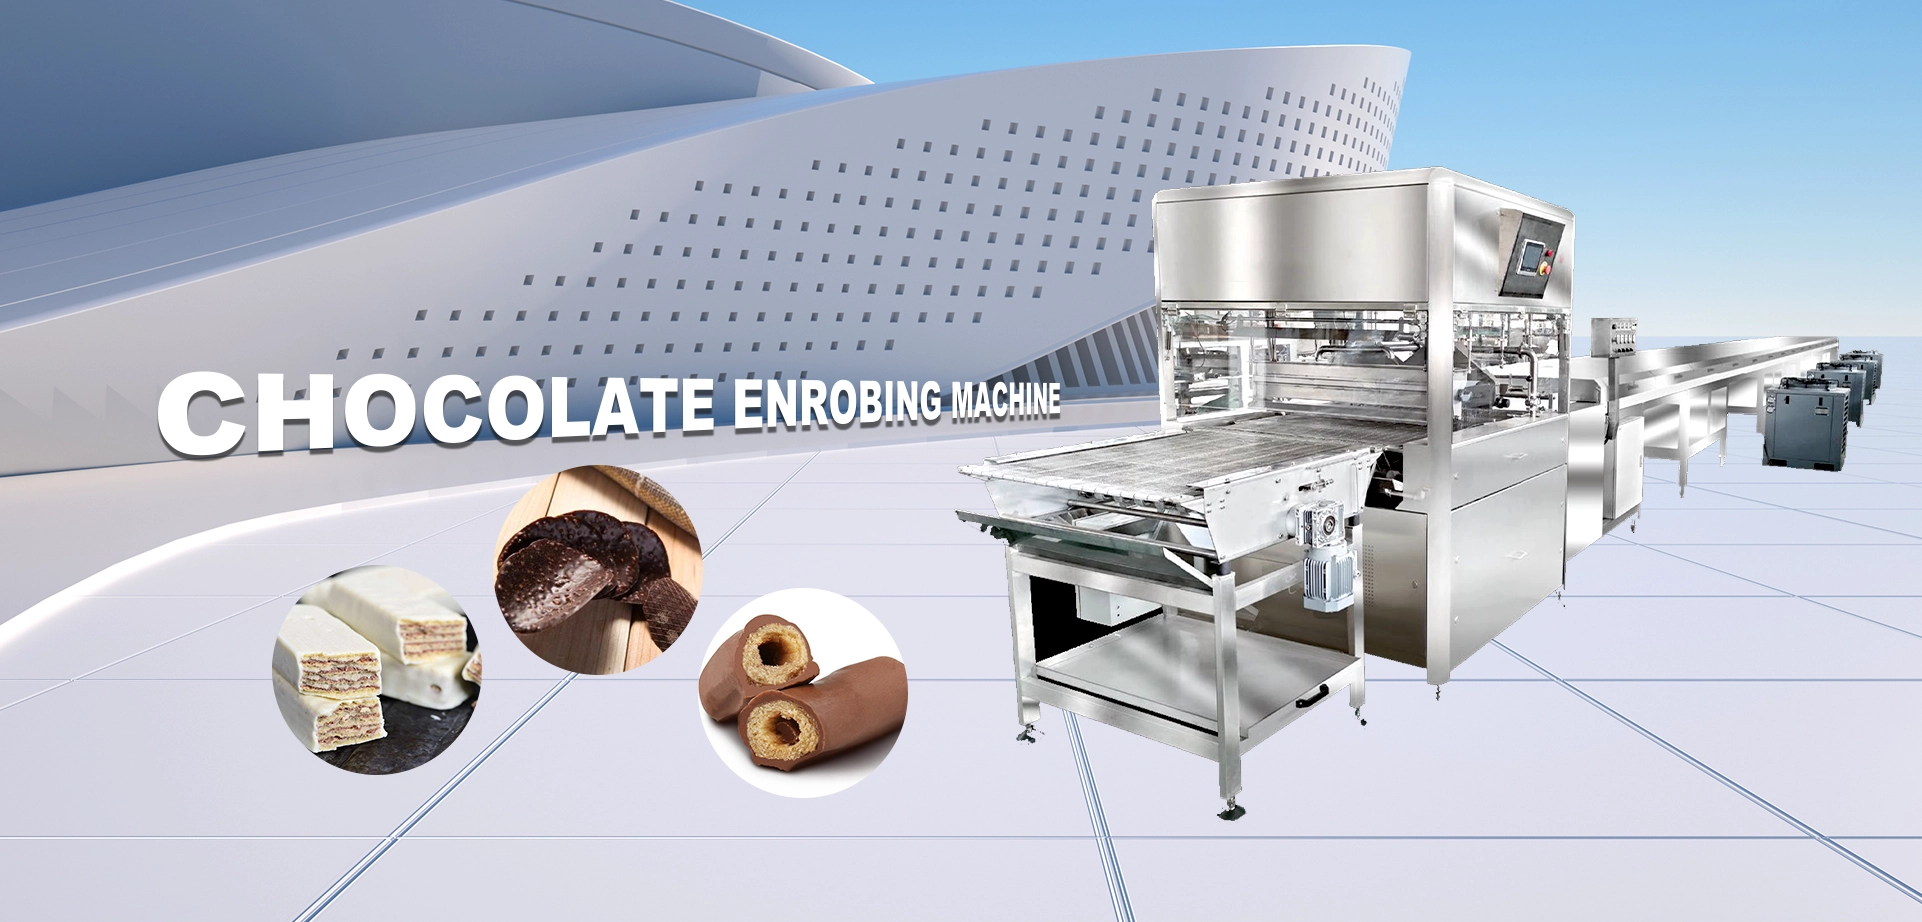
巧克力塗層生產線是將巧克力塗層在威化餅乾、餅乾、煎蛋捲、蛋奶派、膨化食品等表面,以提升產品本身的口感與價值。首先,巧克力漿經過精磨機研磨,然後透過幫浦將巧克力漿輸送到儲槽進行保溫。然後透過泵將巧克力物質轉移至塗層機料斗進行儲存。巧克力漿透過塗佈機內部的幫浦輸送到塗佈機上部的槽體進行噴塗。

巧克力花生生產線

巧克力花生生產線

2026-04-13 11:00:07

巧克力花生是近年來流行的巧克力產品之一。使用簡單的配方和設備。巧克力花生經過巧克力塗層、平衡、著色和拋光後。首先透過精煉機製作巧克力漿,研磨後轉移到巧克力儲存罐。如果顧客不打算自己製作巧克力漿,也可以選擇購買巧克力半成品,將巧克力融化後轉移到保溫罐中使用。將花生倒入拋光機中,透過漿料系統倒入或噴灑到巧克力漿中,在塗覆過程中需要間歇更換熱風和冷風。將巧克力塊包裹在花生表面。塗裝完成後,需靜置24小時後倒入拋光機上色、亮面油拋光。

Fun Chocolate Decor

2018-11-20 15:17:33
Youtube Link:https://www.youtube.com/watch?v=L9fsWT9L_Fk

You can decorate almost any dessert with chocolate. Decorating Cakes with Chocolate is quick, easy and all you need is chocolate chips, a sheet of parchment paper and something to pipe it with; either a ziploc bag, or if you have one, you can use a frosting baggy with a pointy tip (to be completely un-technical). The recipe for the cake photographed above is posted here. Now imagine how pretty this would look over an espresso creme br?lée; Eh, eh?!

Ingredients/ tools for Decorating Cakes with Chocolate:
1/2 to 1 cup semi-sweet chocolate chips (this also works great for white chocolate decorations)
1 sheet of parchment paper
1 frosting bag
Pointy tip or a zip lock bag

Decorating Cakes with Chocolate:
1. Place a sheet of parchment paper on your counter (the least expensive parchment paper is at Costco).
2. Melt 1/2 cup or chocolate chips in the microwave or stovetop (more if you are doing a larger project). Don’t overheat it and check by stirring because the chocolate chips hold their form even if they are hot. If you overheat it, they will crumble and get dry.
3. Transfer your melted chocolate to your piping bag. If it’s a zip lock bag, cut a tiny hole by snipping the very corner of the bag; you can always make the hole bigger but you can’t make it smaller.
4. Pipe your design onto your parchment paper. For more detailed designs, one of my readers suggested that you can print your design on computer paper, then place your parchment paper over the printer paper and trace over it. If you mess up a few times; don’t worry about it; it’s not like you’re piping it onto your cake.
5. Put a cutting board under your parchment paper and transfer it to your freezer for 5 minutes or until chocolate hardens.
6. Now carefully peel it off the paper and transfer it to your cake. It’s easiest to transfer it while it’s still very cold from the freezer (less chances of your 3D chocolate breaking during assembly).

Gosh it’s so easy. It’s too easy! You can also write out chocolate letters so you don’t destroy your cake if your “Happy Birthday” is uglier than you imagined it would be (been there) or if your flower ends up looking like a creature (done that).
If you try this and share a picture on Instagram or Facebook, do let me know. I’d love to see your creative designs!